Hostas are hardy and adaptable perennials typically grown for lush ornamental foliage, although they also bloom. Depending on the cultivar, these leafy shade-loving plants grow in zones 3 through 9. Hostas thrive with little effort, and propagating these plants through division is a great way to help sustain the plants while expanding your collection. Propagating hostas by division is highly effective and easy, making this a task well suited for a gardener with a beginner skill set.

Image Courtesy of @thecolorgreen3 on Flickr
Hostas can be propagated from seeds and stem cuttings. While these propagation methods are effective and not difficult, they are more time consuming. Division is the easiest way to propagate hostas.
How To Divide Hostas
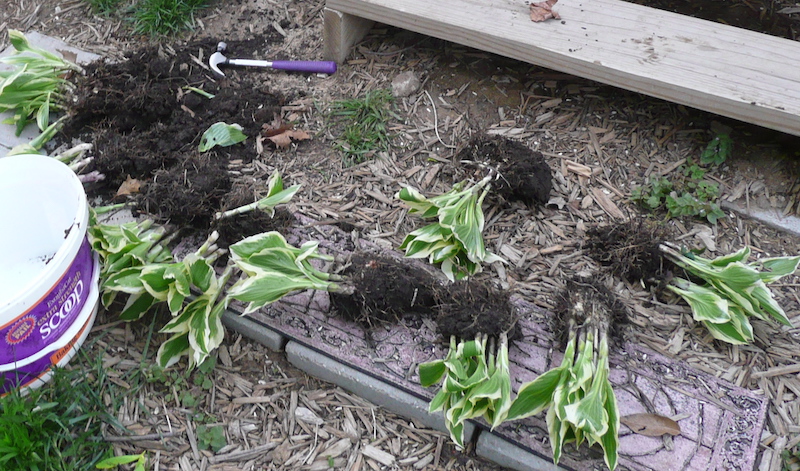
If you have a whole plant, you can usually just pull the pieces off. The hosta will almost fall apart where it is ready to divide (kind of like brisket after 10 hours in the crock pot). Dig a hole for each plant (or just use your hands and scoop away a chunk of soil), place (plop) the plant in and press down gently, but firmly around the edges of the soil to finish. Basically, just throw it in the ground. It will grow.
Many times you might end up breaking a bunch of leaves, especially on large specimens like this 'Sum and Substance', The poor plant looks tortured. He will be ok though. In fact, this photo was taken 2 or 3 days ago. Today, there is quite a bit of leaf growth. By 2 weeks out, the plant will be back to his former glory.
Hosta Sections & Pieces
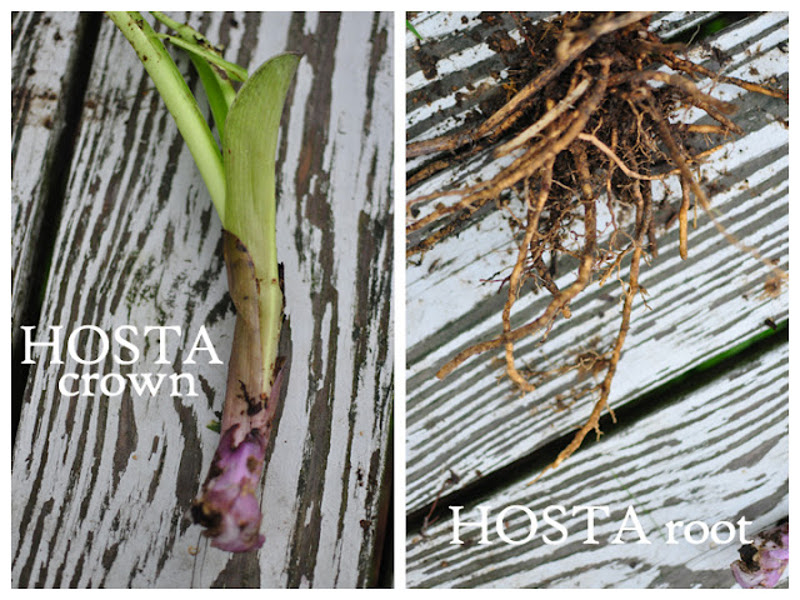
Here are sections of a hosta. The first is the leaf and a little bit of crown (the whitish/purplish part at the bottom). The second is a clump of roots that fell away from the plant when it was being diced. You can plant both. The leaf went about 2 inches deep into the ground. The roots were buried about 2 inches under the surface. Both parts should grow once re-planted.

The Best Time To Divide Hostas
The best time to divide hostas is typically in the spring after the new growth has emerged. This also gives the plants the most time to get established in the newly transplanted spot. You can also divide and transplant hostas in the fall as well. We do not recommend dividing the the summer or winter months.
Steps To Divide & Transplant Hostas
Step 1 - Divide hostas in the spring when new growth pokes through the ground, or in the fall, before the first frost.
Step 2 - Hostas are clump-forming plants that send up new shoots from the rhizomes. Inspect the plant to determine which sections to transplant. Plants creeping too close to a building, trees, or other plantings should be removed.
Step 3 - Wedge a sharp spade or hand trowel into the plant to remove the desired section. Use pressure to sever the roots connecting the plants and remove the section to be transplanted. Alternatively, extract the entire plant and divide it into sections.
Step 4 - Replant the new divisions into a prepared hole or container. Firmly press the soil into place and water the plant to help it settle in.
Step 5 - Backfill the empty spot near the parent plant created by removing the newly propagated section.
Caring For Hosta Divisions
The care for your new hosta will depend on the time of year. Plants divided in the spring will need water every other day for the first few weeks. Once they settle in, the new divisions will need to be watered a few times a week during the first growing season. Monitor the soil moisture, and water when the top inch or two feels dry.
Hostas divided in the fall should also be watered regularly during the first two weeks after planting. After the first hard frost, remove the spent foliage to reduce the risk of fungus growth and overwintering pests. New growth will emerge in the spring and should be watered weekly or more during dry weather for the first growing season.
Methods To Propagate Hostas
Propagate hostas by seeds, stem cuttings, or division. Seed pods can be collected and dried during late summer. It typically takes several weeks for seed pods to dry, which is necessary to collect the seeds. Hosta seeds can be started inside and moved outdoors in the spring, or seeded directly in the ground in the late fall or early spring.

Image Courtesy of @jacki-dee on Flickr
Create more hosta plants by taking stem cuttings. The cuttings must include the lower part of the stem that is white because this is where the roots will grow. Hosta stem cuttings can be propagated in water and transplanted to the ground or a container when the roots are at least one inch long.
Hostas are clump-forming plants that naturally create new plants and spread out with time. These clumps can be separated from the main plant and transplanted to create new plants.
What You Need To Propagate Hostas
Part of what makes propagating hosta plants so easy is that not many supplies are necessary. To propagate hostas by seeds, you will need a sharp knife or pruning shears to remove the seed pods. To take cuttings or divide hosta plants, you will need a sharp spade or garden saw. For stem cuttings, find an empty jar, vase, or vessel to hold water and the cuttings. You will also need moist, well-drained potting mix and containers if you intend to start the new plants inside.

Image Courtesy of @David on Flickr
 |
Author Alison Cotsonas - Published 08-14-2023 |


