Rooting Hydrangeas
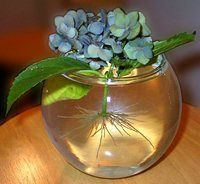 Hydrangeas are fairly easy to root. Some people have rooted them in water, but many others (such as myself) have never been able to make this work.
Susan Park Cole sent us the picture to the right demonstrating that it is possible to root hydrangeas in water. Occasionally roots form when one leaves an arrangement in water for a long time. In my experience, though, this method fails more often than it succeeds.
Below are two fail-proof methods for rooting hydrangeas.
Rooting Hydrangea Cuttings in 5 Easy Steps

Take a cutting from a branch of the hydrangea shrub about 5-6" long. Most experts say the cutting will work best if taken from a branch that did not flower this year.
Remove the lower leaves of the bottom two leaf nodes.(see pictures #3 and #4)
Cut largest leaves down to about half their size
Dip cuttings in rooting hormone (this is entirely optional) and insert into damp vermiculite, coarse sand or other sterile medium.
Water pot well and allow to drain. Make sure soil is moist but not soggy. Cover cuttings and pot with plastic. Try to keep plastic from touching leaves by adding stakes (#5) or
See some short-cut methods below sent to me by visitors to this site.
O.K., I admit I stuck three steps in number 5, but this really is simple.
TIPS: Place cuttings in bright light. NEVER PLACE NEW CUTTINGS IN THE SUN. They will cook in the plastic. And even if they are not in plastic, they should be placed in a bright shady area.
Do not water again until top of soil begins to feel slightly dry. Overwatering will cause cuttings to rot.
Expect cuttings to begin to form roots in 2-3 weeks depending on temperature (faster in warm weather) and humidity. Some cuttings root in as little as one week. If a tug on the cutting resists the pull, it is rooting.
Note on Overwintering Cuttings
Getting cuttings through the first winter without a greenhouse is the hardest part of starting new hydrangeas from cuttings. Start new cuttings early in the summer to give them the best chance for surviving the winter.
While some people manage to take cuttings through the winter indoors, in general, this does not work well. Hydrangeas do best if grown outdoors. Here are two suggestions for getting cuttings through the winter:
(1) sink pots of cuttings into the ground and cover well with lightweight mulch.
(2) put smaller pots of cuttings next to a foundation and cover them with large clay pots for the winter.
Rooting Hydrangeas in a Cup
Carl Brady, an Ohio visitor to this site, sent pictures of the easy way he roots hydrangea cuttings. He says, "I have good luck starting cuttings using regular Styrofoam cups for the medium and a larger clear plastic cup for the top. It works just like a small green house." (As most of you know, the word "medium" refers to the vermiculite, course sand, or other substance the cuttings are stuck into).

When cuttings are well rooted, Carl transplants them into a larger container (right). In this instance, the process was obviously very successful.
* * *
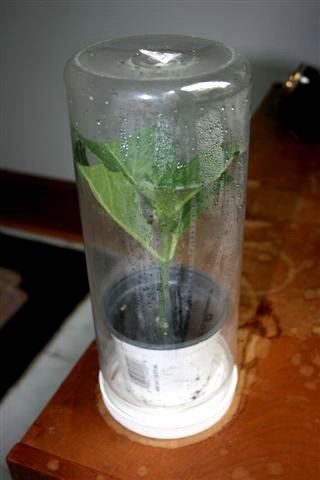 Another visitor to this site reports using a three liter coke bottle: "Cut the top part (or funnel plus a couple of inches) off a two or three liter bottle of cola. You can then place the bottle (funnel part) over the pot with the wider opening down. It works like a little greenhouse."
* * *
Here is another suggestion from Eileen Ridge of Virginia. She says that when she read the instructions above for rooting hydrangeas she was overwhelmed with the idea of using stakes and plastic tents. She almost gave up until she saw the idea of rooting cuttings in cups submitted by Carl Brady above. Then she came up with a variation on the cup idea, and, for the first time she was able to root cuttings of her purple hydrangeas.
Eileen says "I love this concept because after setting up the cutting, watering it well, and letting the excess drain, the cap of the inverted container acts like a tray and allows for a little more drainage if necessary, and the container just pops down on the lid (I don't screw it back together, I just leave it to rest there)."
Eileen has friends and neighbors lining up for the new purple hydrangeas. The world will be a better place.
Ground Layering Hydrangeas
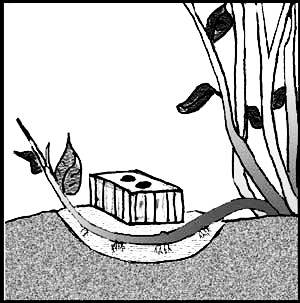 This is a very easy method. I love it. However, one is limited to rooting only a few new plants at a time unless he/she has many hydrangeas.
To ground layer, select a branch close to the ground (or several).
Remove the leaves for about 5-6 inches at the spot where the branch touches the ground and scrape a little of the bark off the under-side of the branch in this area. Make sure at least one leaf node will be under the ground. The leaf node is where a leaf comes out of the branch and most roots will form.
Do not cut the branch off the mother plant. Dig a little trench about 2 inches deep and lower the branch into it and cover generously with soil (potting soil would be nice but is entirely optional).
. Put a brick or stone on the buried area so that it will stay under the soil. This also helps to hold the moisture around the branch. Keep it watered occasionally. When roots form, the branch can be removed from the mother plant, potted up and treated like a mature cutting.
Tip from Linde S. of North Carolina: Linda writes that when she ground layered a new hydrangea plant, the new branch would grow roots just fine. But after it was separated from the mother plant and potted up, it it often went into shock and would require a lot of TLC before it would start growing well again.
Then she discovered that if she added one extra step, the new little plant would recover and thrive much faster. Here is what she suggests: When the new branch, which is attached to the mother plant, is well-rooted, cut it off of the mother plant but leave it in the ground without disturbing it for a few more weeks, so it can become accustomed to growing on its own. Then transplant it. It will stay much healthier and be better able to thrive without the mother plant. I have tried this, and it really does work.
Pot Layering Hydrangeas
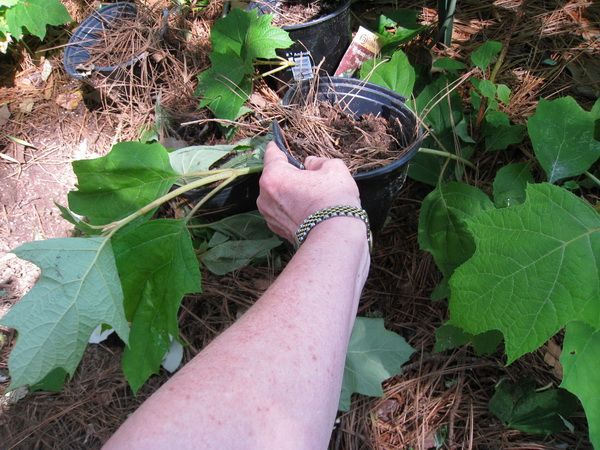
Tip from Anne of Corinth, MS: Anne writes that she, too, has a method that seems to decrease the shock of cutting the new hydrangea plant from the mother plant. Instead of burying the stem in the ground, as described above, she leaves the stem on the top of the ground and roots it in a pot. She describes it this way: "I cut the mature leaves off a long stem with bud nodes, nick the area at the node I want to root, and dust with rooting hormone. Then I slice a 5"-7" pot about half way down opposite sides and lay the stem horizontal into the pot -into the slits on the side and cover with soil. Then months later (or even the next spring) I cut the mother lode loose and tear off the pot and put the new plant into the ground."
Anne's pictures of her Oakleaf hydrangea below demonstrate:
(1) The split pot with the stem, covered with soil, going in one side and out the other
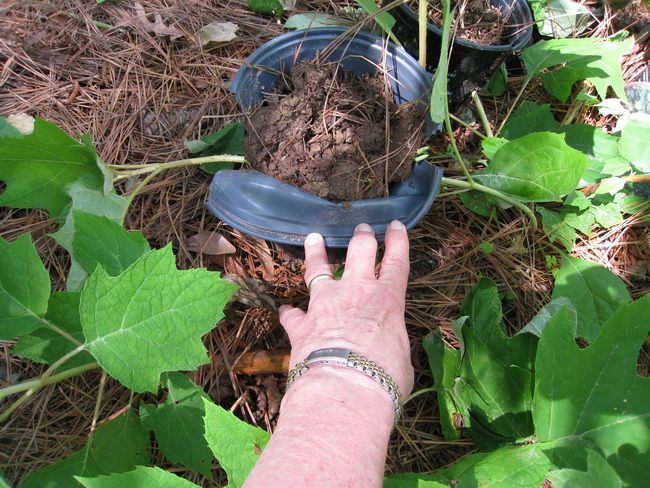
(2) The pot with sides back in place

(3) The finished procedure.
To keep the soil in the pots moist, I would use potting soil, then water the soil in the pot well, and cover the pot with plastic. However, don't use plastic if the pot will be in the sun. The cutting might cook it.
 |
Author Judith King - Published 10-17-2017 |


